27.6.13

Swatch & Review: Femme Fatale Cosmetics 'Nightsong Grotto' & 'Hydraxia'

So I'm finished with uni for a while now and I'm excited to be able to focus on my blog! I've also finally found a layout that I'm happy with and have renamed my blog to 'Muggle Manicures'! Like it? I think it's heaps better than 'Swish & Flick Nails' :)

I've got five more Femme Fatale Cosmetics polishes to show you and today I'll be reviewing  'Nightsong Grotto' & 'Hydraxia'.

First up is 'Nightsong Grotto'! This gorgeous polish is a teal jelly filled with large, medium and small aqua circles, large blue hexes, smaller green hexes, small pink dots and a scattering of pink and blue holo flakies.
The jelly base allows the beautiful combination of glitters to shine through and gives this polish great depth.

'Nightsong Grotto', outdoor light

'Nightsong Grotto', outdoor light
For my swatches I used two thin coats of 'Nightsong Grotto' over one coat of Sally Hansen 'Jungle Gem' which is a deep greenish teal that works perfectly as a base for 'Nightsong Grotto'. I sealed it with Essence 'Gel Look Topcoat' for a glassy finish that showed off the deep jelly-ness of this polish.

'Nightsong Grotto', lamp light

I had no problems with the application of this polish. Minimal fishing was required for the large circles but we all know that that's to be expected and the payoff is so worth it!

'Nightsong Grotto', lamp light


Next up, 'Hydraxia'! Similar to 'Nightsong Grotto', this polish features a deep teal jelly base but the combination of glitters make it a totally different polish.

'Hydraxia', sunlight

The glitter in this polish includes lots of multi-sized hexes in different blue shades with tiny yellow circles that really stand out in contrast from the blue base. This best part is that 'Hydraxia' is so absolutely packed with glitter that I only needed one coat!


'Hydraxia', sunlight
For my swatches, I use one coat of 'Hydraxia' over two coats of Chi Chi 'Blue Steel'. You could also use a teal or dark green base for this polish. I then finished them off with Essence 'Gel Look Topcoat' (my favourite topcoat for glitters).

Chi Chi 'Blue Steel', outdoor light

Application was perfect! It was really easy to apply with no fishing or dabbing whatsoever with a perfectly even and balanced combination of glitter.

'Hydraxia', outdoor light
So tell me, which one is your favourite? I love 'Hydraxia' for it's little dots of yellow but the large circles in 'Nightsong Grotto' are just beautiful.

Femme Fatale Cosmetics is an Australian based, 3-free, indie brand. You can purchase both of these polishes from Femme Fatale Cosmetics here if you're in Australia. You can find International stockists for this brand here.

Stay tuned for my next Femme Fatale Cosmetics post featuring 'Twilight Meteorite' and 'Edge of the Cosmos'.


26.6.13

Blog name change!

I'm considering a blog name change because I'm just not entirely loving "Swish & Flick Nails" so I need you ladies to help me decide! I still want it to be Harry Potter themed and I've narrowed it down to three possible names. They are:

  1. Patronus Polish
  2. Muggle Manicures (leaning towards this one I think!)
  3. Nimbus Nails
What's your favourite? Please let me know in the comment!

Caitlin, xo


17.6.13

Swatch & Review: Femme Fatale Cosmetics 'Keeper of the Grove'

Hi guys! Today I have some swatches (and a review) of Femme Fatale Cosmetics 'Keeper of the Grove' to show you. I actually received this polish as a complimentary 5mL sample in my recent Femme Fatale Cosmetics order. I don't own that many green polishes so I was really surprised at how much I loved this one!


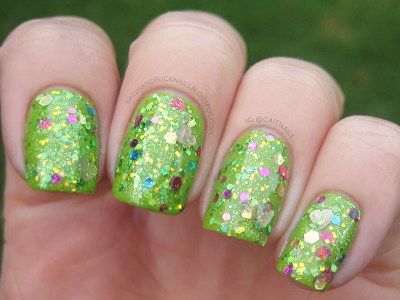
'Keeper of the Grove' is an epic glitter bomb! There's so much going on in this polish. It has green, gold, pink and blue hexes, pink and blue circles, and big pale pink hearts with gold flakes in a lime green jelly base.


You can wear this on it's own and reach opacity at 3 coats but I opted to use it over a green base.

For the base colour I used Australis 'Limited Edition 2'. This was the first time I'd used this polish and it was a dream to apply. Such perfect formula and opaque in two coats. I love Australis!


Application for 'Keeper of the Grove' was great. It wasn't too thick and I only needed one coat to get an even amount of most of the different glitters but I did have to search a bit for the large hearts. I just placed the individual hearts on each nail with an orange stick. Easy fixed!


Overall, from the formula to the application to the colour of the glitters,  I was very impressed with this polish! Femme Fatale Cosmetics is an Australian based, 3-free, indie brand (who also do eye shadows!). You can purchase your own bottle of 'Keeper of the Grovehere if you're in Australia and here for you international ladies.

Caitlin xo


11.6.13

Follow me on Bloglovin!

Follow my blog with Bloglovin
I'll be finished with uni on June 21st so after that expect lots of new posts! I received my Femme Fatale Cosmetics order last week so I'll have swatches and reviews of those beauties up very soon. :)
Until then, here's a pic of the polishes I got!
L-R: Emily de Molly 'Sakura', Femme Fatale Cosmetics 'Hydraxia', 'Twilight Meteorite', 'Keeper of the Grove', 'Nightsong Grotto', 'Edge of the Cosmos', 'Winter Hyacinth'

Caitlin xo


6.6.13

Nail Art: Harry Potter Inspired Nails

For my first post I thought it would be fitting to do some Harry Potter inspired nail art because that's where 'Swish & Flick' comes from! I chose to call this blog 'Swish & Flick' because I feel like nail polish brushes can be like magic wands that you can make magic with (i.e. beautiful colours and designs). I guess I also just wanted the name to be HP related because I love HP and nail polish :)

and now for my Harry Potter inspired nails!

Sunlight shot with Harry Potter and the Philosopher's Stone


Sunlight shot

The symbols I used to represent HP were (L-R): Harry's Hogwarts letter, Hedwig's feather, the Golden Snitch, and the Deathly Hallows.

This is only the second time that I've attempted nail art using acrylic paints so there's a lot of room for improvement! I screwed up the Hogwarts emblem on the envelope but apart from that I'm really happy with how they turned out :) Hedwig's feather on my middle finger was the first feather I've painted and I'm really proud of it. Feathers are really easy to paint but they look so effective!

At first I was having a little trouble working with the acrylic paint because I found it to be a little thick (it was very cheap paint!) but after adding a tiny bit of acrylic glaze medium it became much more workable!

I used Essence Color & Go Blue Addicted as the base and added some lose gold hex glitters after I'd finished with painting and sealed them with a top coat.

Indoor shot w/ artificial light

Indoor shot w/ artificial light

I finished them off with Seche Ultra V topcoat (which is amazing) and three days later they are still perfect with no chips at all :)


Indoor shot w/ artificial light and a Golden Snitch!

Let me know what you think! Feedback is much appreciated :)
Caitlin, xo


3.6.13

Welcome to Swish & Flick Nails!

Welcome to my new blog!

I've been posting nail art and nail polish swatches on Instagram as @caitnails for almost a year now and I think that now is the time to start up a blog! I'll be posting my own nail art photos, nail polish swatches, reviews of nail polishes (mainstream and indie brands), and maybe even some tutorials in the future :)

I have some polishes from Femme Fatal Cosmetics and Emily de Molly coming to me in the post this week so I'll be posting swatches of those very soon!

Caitlin xo