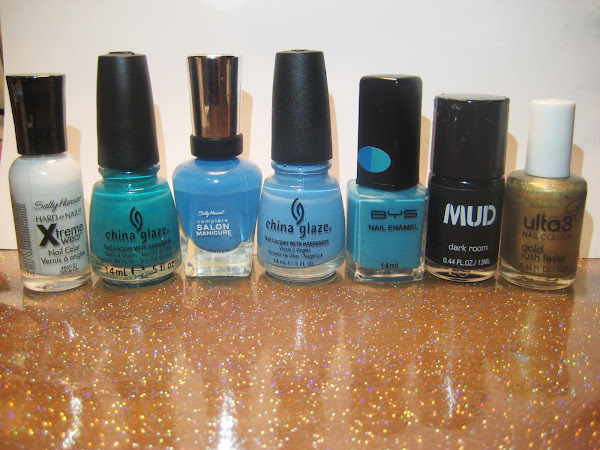
I've been seeing turquoise stone nails floating around Instagram and Pintrest recently and I wanted to give them a go! Most tutorials out there suggest that you use the waterspotting technique to get the black speckled effect. After failing miserably at this technique, I decided that I would just use the really easy cling wrap method.
This is what I ended up with:
Do you like them? I love them! I was so happy with them I thought I would make a tutorial so you ladies can give these nails a try. :)
Please keep in mind that this is the first tutorial I've written so I hope that I've explained the steps will enough!
~~~~~~~~~~~~~~~~~~~~~~~~~~~~~~~~~~
- White (I used Sally Hansen 'White On')
- Black (I used M.U.D 'Dark Room')
- Metallic gold (I used Ulta3 (Gold Rush Fever)
- Turquoise (I used China Glaze 'Turned Up Turquoise)
- Sky blue (I used Sally Hansen 'The Sky's the Limit')
- Pastel (ish) blue (I used China Glaze 'Bahamian Escape')
- Greenish blue (I used BYS 'Colour Change Blue')
- Plus a base and top coat of course!
You will also need the following tools:
- Cling wrap
- Makeup sponge
- Orange stick (or anything you can use to mix polish together on some paper)
- Acetone
- a small angled brush for clean-up
Start with a white base. It doesn't have to be perfect because you'll be painting over it with the turquoise. Using white as a base will help make the turquoise looking really bright.
Next, apply your turquoise polish until it reach opacity (I used two coats).
Take your makeup sponge (dampened slightly with water) and apply the sky blue polish directly to the sponge. Dab the sponge on a piece of paper a few times if you think you've put too much polish on it. Next, dab the sponge randomly on the nail, allowing the turquoise coat to still show through.
On a clean area of the makeup sponge, apply the pastel blue polish and dab it on the nail sporadically, focusing more on the edges of the nail.
Repeat this sponging process with the greenish blue polish.
Cut your cling wrap into small pieces and scrunch it up.
On a piece of paper, drip a small drop of black polish and a bigger drop of turquoise polish.
Mix them together with an orange stick (or whatever you can find!)
Take your cling wrap bunch and dab it onto the polish. Then dab the cling wrap onto the paper a few times until only a very small amount of polish is left on it.
Dab your cling wrap bunch on the nail once. You don't need too much of the black.
Repeat the cling wrap method with the turquoise polish to help blend the black.
Repeat the cling wrap method with the metallic gold polish until you're happy with the amount of gold that you have.
Dip your small angled brush in acetone, dab it on some paper then slowly clean away any polish you have on your skin/cuticles. Add a nice glossy top coat and you're done!
~~~~~~~~~~~~~~~~~~~~~~~~~~~~~~~~~~
Good luck with creating your own turquoise nails! Remember that the idea is that they look natural like the stone so don't be too fussy with your sponging/cling-wrapping, let it happen organically!
If you have any questions or comments about this tutorial please let me know :)
Caitlin, xo


3 comments:
Love this tutorial! I am going to try it out right now! X
Looks fantastic!!!!
I will definitely need to try doing them like this :D Great tutorial lady
Post a Comment